
Are you handy and would you prefer to make your raised garden bed kit yourself? Here’s how. If you use this design, I just ask that you email me to let me know how it went, or leave a comment on this page. (Here’s an example of a DIY job that went “swimmingly.”)
Materials
- (6) 8′ lengths of 5/4 (pronounced “five-quarter”) cedar decking.
- (1) 8′ length of 4×4 cedar post (enough for 2 beds, but it’s sold in 8′ lengths or more)
- (32) 3″ or 2.5″ deck screws
[A note about materials: not all cedar is equal. I buy mine from Heath Lumber in Trenton. They sell only random lengths (no shorter than 8′ and typically in increments of 2′). Home Depot also has cedar decking and you can guarantee buying all 8-footers, but the quality is not the same, especially for the 4×4 posts. Unfortunately, neither outlet has definitive information about the forestry practices of their sources. I have special ordered white oak from Heacock Lumber in Pennsylvania, where they use wood sustainably harvested from the region.]
Cuts
First cut the cedar post into 4 11″ lengths. Then cut 2 of the pieces of decking in half.
Drilling
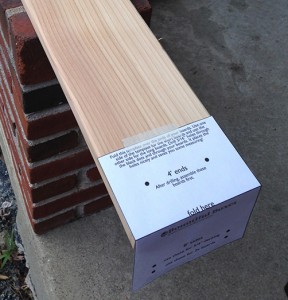
Go to the free template here, cut it out and fold it over the end of the boards. Drill through the black dots using a 3/16″ bit (this is a “clearance hole” so the screw threads pass through without digging into the wood). This places the holes so the screws will go into the middle of the 4×4 post.
If it’s not convenient for you to print the template, the basic idea is this: drill the holes for the short boards 1.75″ from the end of the board; drill the holes for the long boards 2.75″ from the end of the board. If you’re using wood other than 5/4 decking, then, instead of 2.75″, add the thickness of your boards to 1.75″. For example, if you’re using 2x lumber, which is 1.5″ thick, then drill the holes 3.25″ from the ends of the long boards. This placement implies that you’ll assemble the short boards first.
Assembly
Follow the steps on the Construction Instruction page.
